


















Lesson 6 of 46 · Design Process and Loads
The Design Process and Requirements
Learn how engineers turn a vague need into a requirement list, generate concepts, iterate on sizes with calculations and document the result so the design can be built and trusted.
Experienced engineers rarely start by calculating. They start by asking what the machine must do, how long, for whom and for how much money. They write the answers down, because a design is only as good as the requirements it is measured against. Only then do they sketch concepts, pick one, and begin the calculations that turn it into dimensions.
This lesson walks through that process with a concrete example, shows how an iteration loop converges on a size, and explains why a short written trail of assumptions is as valuable as the numbers themselves.
What you will learn
- How to turn a vague need into measurable requirements, separating demands from wishes.
- How to generate several concepts and choose one without bias.
- How an iteration loop converges on a diameter, and why standard sizes matter.
- What to document so another engineer (or you in a year) can trust the design.
Key terms
- Requirement: a measurable statement of what the design must do, such as "lift 500 kg through 3 m in under 20 s".
- Demand and wish: a demand must be met or the design is rejected; a wish is desirable and used to rank options.
- Concept: a rough solution principle, described by a sketch and a few numbers.
- Iteration: repeating guess, analysis and improvement until requirements are met.
- Preferred number: a standard value (such as 14, 16, 18 mm) chosen from a geometric series so parts and tools are available.
Step 1: Requirements
A need like "I want something to lift water from a well" is too vague to design. A designer converts it into requirements that can be checked.
| Type | Example for a hand winch |
|---|---|
| Function | Raise a bucket and rope, hold the load without a brake lever |
| Load | 500 N working, 1,500 N worst case if the bucket jams |
| Performance | Lift 12 m in under 90 s with a crank force under 80 N |
| Life | 10,000 lifts |
| Environment | Outdoors, rain, temperature −10 to 40 °C |
| Cost | Under $120 to make |
| Safety and codes | No rope slipping; guard on gears; comply with local regulations |
Split the list into demands (must) and wishes (nice to have). "Must hold the load safely" is a demand. "Prefer under 8 kg" is a wish. Demands are filters; wishes are used when two concepts both pass the filters.
Good requirements are numeric. If a requirement cannot be tested, it cannot be verified. "Quiet" becomes "below 70 dB at 1 m". "Light" becomes "below 8 kg". Where the customer gives only words, ask until you can turn them into numbers.
Step 2: Generate concepts
Now widen the search. List the sub-functions (convert hand motion to rotation, reduce the speed, wind the rope, hold the load) and, for each, list several ways to achieve it. This table of options is called a morphological chart. You then combine one option from each row.
The number of combinations grows quickly: four sub-functions with four options each give 256 designs. Most combinations are silly, and screening them against the demands quickly leaves a handful. The point is to avoid grabbing the first idea. Teams that stop at the first idea often keep it simply because it came first, not because it is the best.
Press Run (or Ctrl + Enter) to see the result here.
Program input · what you'd type while the program runs
Type the answers before you press Run, one per line. Each time the program reads a line (with input()), it gets the next line from this box.
Notice how a few simple screening rules cut the field. The surviving concepts are then compared with a weighted matrix like the one in the previous lesson.
Step 3: Embodiment, sizing and iteration
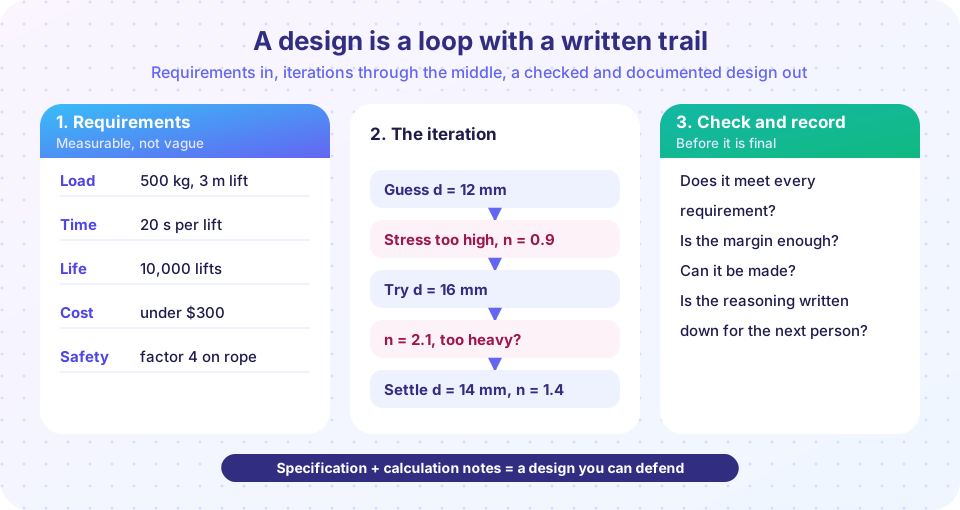
Once you have a concept, you draw a rough layout, estimate the forces on each part and start sizing. Here is the part beginners find strange: you must guess first. Stress depends on diameter, and you need the stress to find the diameter. The way out is to guess, calculate, adjust and repeat.
Take a shaft carrying a steady torque of 80 N·m, in steel with yield strength 370 MPa. Shear yield is about Ssy = 0.577 Sy = 213 MPa. The shear stress in a solid round shaft is τ = 16 T / (π d³) and the factor of safety is n = Ssy / τ.
- Guess
d = 12 mm. Thenτ = 16 × 80,000 N·mm / (π × 1,728 mm³) = 236 MPaandn = 213 / 236 = 0.90. Below 1: it would yield. Reject. - Try
d = 16 mm.τ = 99.5 MPaandn = 2.1. Safe, but is the shaft heavier than it needs to be? - Try
d = 14 mm.τ = 148.5 MPaandn = 1.4. This may be the answer if the project requires a factor around 1.4 for this loading.
Because stress changes with the cube of the diameter, each step teaches you a lot. You can also solve directly: d = (16 T / (π Ssy / n))^(1/3). But in real designs the stress also depends on stress concentrations, bearing locations and fatigue, so a direct formula often is not available, and iteration is how you proceed.
Round to a standard size
After the calculation you round up to a standard size, such as one from the Renard preferred-number series: …, 10, 11.2, 12.5, 14, 16, 18, 20, 22.4, 25, 28, 31.5, 35.5, 40 mm. Standard sizes exist because tools, bearings, seals and stock bar all come in standard sizes, and a non-standard diameter costs more to make and to source.
Press Run (or Ctrl + Enter) to see the result here.
Program input · what you'd type while the program runs
Type the answers before you press Run, one per line. Each time the program reads a line (with input()), it gets the next line from this box.
The same problem solved three ways (guess and check, formula, standard size) gives answers that agree, which is a good sign.
Step 4: Evaluate and detail
Evaluation asks whether the sized design meets every requirement, not just the one you calculated. Strength might be fine while the shaft deflection spoils a gear mesh, or the cost might be above the limit. If any demand fails, you go back a step: change the dimension, the material or the concept.
Detailing produces the drawings. Every dimension carries a tolerance (how much it may vary), shafts carry a fit class for bearings and gears, and surfaces carry finish notes. These details strongly affect life: a shoulder with too small a corner radius multiplies stress (stress concentration), and a rough surface cuts fatigue strength (endurance limit modifiers).
Document the trail
A drawing says what but not why. Keep a short design record with the requirements, the assumptions (load cases, material properties and where they came from), the calculation steps with units, the safety factors and the reason a concept was chosen over the others. Five years later, when someone asks whether the winch can be uprated to 750 N, that record is the difference between an hour's work and a risky guess.
Responsibility is also part of the process. Engineers sign designs; codes and standards (for lifting equipment, pressure vessels, elevators, vehicles) exist because past failures hurt people. When your machine can injure someone, follow the relevant code, and treat a safety factor mandated by a standard as a minimum rather than a suggestion.
Common misconceptions
- "Requirements limit creativity." The opposite is true: a clear target makes creative options comparable. Without one, you cannot say which idea is better.
- "Iteration means the first design was bad." Iteration is normal. Stress depends on size and size depends on stress, so an exact answer needs repeated passes.
- "Round to the nearest size." For strength, round up. A diameter rounded down can leave the part below its required safety factor.
Check your understanding
Quick check · 5 questions
of 5 answered You scored / 5 · perfect!
-
1. Which of these is a measurable requirement?
A measurable requirement states a quantity and limit that can be tested. The others are vague. -
2. What is the main purpose of a morphological chart?
It forces a wider search for concepts by listing several solutions per sub-function. -
3. A calculation gives a required diameter of 13.1 mm. Standard sizes are 12.5, 14 and 16 mm. Which do you choose, other things equal?
Round up to the next standard size so the strength requirement is still met. 12.5 mm is below the needed value. -
4. Why does sizing a part usually need iteration?
You cannot compute stress without a size, so you guess a size, compute, adjust and repeat. -
5. Why should assumptions be written down?
A written trail of assumptions and calculations lets a design be reviewed, modified and defended.
Summary
- Convert a need into measurable requirements; separate demands from wishes.
- Generate several concepts with a morphological chart before committing to one.
- Size by guessing and iterating, then round up to a standard size.
- Evaluate against every requirement, then detail with tolerances and fits.
- Document assumptions and calculations, and follow the relevant codes.
Next: Loads and Load Paths
Track your progress
Create a free account to tick off lessons and pick up where you left off on any device.
of Machine Design lessons completed