


















Lesson 1 of 46 · Getting Started
Course Map: How to Study Machine Design
Start here. See who the Machine Design course is for, what you need first, how the nine chapters fit together and how to study them with worked examples and simulations.
Every machine you have ever used was designed by someone who had to answer a handful of plain questions. How big must this shaft be so it does not snap? Which bolt will not loosen? How long will this bearing last? Which gear tooth will carry the load for ten years? Machine design is the craft of answering those questions with numbers, so that a part is strong enough, light enough, cheap enough and still works after millions of turns.
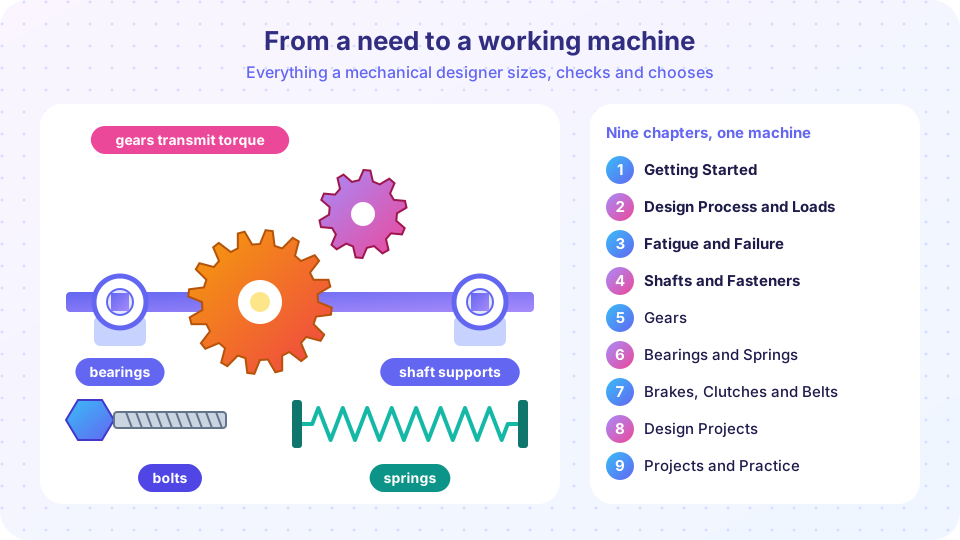
This course teaches that craft from the ground up. You will learn to size shafts, bolts, gears, bearings, springs, brakes, clutches and belts. You will learn why parts fail (often not at the load you expect) and how engineers prevent it. Every lesson has worked examples with real numbers, a picture of the idea and small programs you can run to explore the formulas yourself.
What you will learn
- What machine design is and how it differs from pure analysis.
- Who the course is for, what you should know first and how the nine chapters connect.
- How to study: by working examples, checking units and running the simulations.
- Which habits (units, sketches, safety factors) will keep your answers trustworthy.
Key terms
- Machine element: a standard part that appears in many machines, such as a shaft, bolt, gear, bearing or spring.
- Stress: force per unit area inside a part, measured in pascals (Pa) or megapascals (MPa).
- Strength: the stress at which a material yields or breaks; a property of the material.
- Factor of safety: how many times stronger a part is than the load it must carry.
- Fatigue: failure from repeated loading at stresses well below the static strength.
Who this course is for
The course is written for engineering students in their second or third year, for technicians moving into design, for makers who want to size parts instead of guessing, and for working engineers who need a clean refresher. You do not need to have built a machine before. You do need three things.
- Statics. You should be able to draw a free-body diagram and solve for reactions at supports. If not, the Engineering Statics track on this site covers it.
- Strength of materials, at least the basics. Axial stress
σ = F/A, bending stressσ = M c / I, torsional shearτ = T r / J. We will review these quickly when we use them. - Algebra and a little calculus. We use logarithms, powers and square roots. Nothing beyond that.
Metric (SI) units are used throughout. The article of faith in this course is simple: write the units on every number.
How the course is organized
The nine chapters follow the order in which a real project unfolds. First you learn the way of thinking, then the loads and failure modes, and only then the parts that are built from them.
- Getting started
- Design process and loads
- Fatigue and failure
- Shafts and fasteners
5 to 7. The elements
8 and 9. Projects
The first four chapters are the foundation. Chapters 5 to 7 apply it to the classic machine elements. The last two chapters bring everything together in complete design projects. This slice of the course covers chapters 1 to 4; every lesson links forward to the next one, and every chapter ends with a review quiz.
How to study each lesson
Each content lesson follows the same skeleton so you always know where you are.
- What you will learn lists the outcomes. Read it first, and come back to it at the end to check yourself.
- Key terms define the vocabulary. Machine design has a lot of words that sound alike (strength, stiffness, stress, toughness), and they mean different things.
- Worked examples come before exercises. Follow them with a pencil. Cover the solution and try the numbers yourself.
- Common misconceptions warn you about the beliefs that cause real design errors.
- Try it gives you simulations. Change the numbers and watch what happens. Experimenting teaches faster than reading.
- Check your understanding is a short quiz with explanations for every answer.
Keep a one-page notebook of every formula you use, with its units and the situation where it applies. Machine design has many formulas, and most mistakes come from using the right formula in the wrong situation.
A first taste of the numbers
A motor delivers 7.5 kW at 1,500 revolutions per minute (rpm). How much torque is that? Power is torque times angular speed, P = T ω, where ω = 2π n / 60 in radians per second. So T = P / ω = 7,500 W / 157.1 rad/s = 47.7 N·m. A shaft sized for 47.7 N·m is the first problem you will solve in chapter 4. Notice how many things we assumed: steady power, no losses, no overload. Removing those assumptions is what the rest of the course is about.
Press Run (or Ctrl + Enter) to see the result here.
Program input · what you'd type while the program runs
Type the answers before you press Run, one per line. Each time the program reads a line (with input()), it gets the next line from this box.
Notice that at the same power, a slower shaft carries more torque. That is why low-speed shafts in gearboxes are thick and high-speed shafts are slim.
Common misconceptions
- "A bigger part is always safer." Not always. A larger part can be heavier, more expensive, and in rotating machines it stores more energy. It can even fail sooner if the extra size creates a bad stress concentration.
- "If it holds the load once, it is safe." A part that survives a single load can fail after a million smaller loads. That is fatigue, and it is the most common cause of broken machine parts.
- "Design is just calculation." Calculation checks a design; it does not invent it. The designer chooses layouts, materials and tolerances first, then calculates.
Check your understanding
Quick check · 4 questions
of 4 answered You scored / 4 · perfect!
-
1. A shaft delivers the same power at half the speed. What happens to the torque?
Power equals torque times angular speed, so at constant power torque is inversely proportional to speed. Half the speed means double the torque. -
2. Which is a machine element?
A machine element is a physical standard part used in many machines. Tolerances and safety factors are design quantities, not parts. -
3. Which prior knowledge does this course assume most strongly?
You need free-body diagrams and the basic stress formulas for axial load, bending and torsion. Everything else is introduced as needed. -
4. Why does the course insist on writing units on every number?
Carrying units through every step lets you catch mistakes such as mixing millimeters and meters or N and kN. Famous engineering failures have come from unit errors.
Summary
- Machine design turns needs into sized, checked, drawable parts.
- You need statics and basic strength of materials; the rest is taught here.
- Nine chapters run from mindset and loads, through failure and fatigue, to shafts, gears, bearings, springs, brakes and complete projects.
- Work every example with units, and use the simulations to explore.
Next: What Is Machine Design?
Track your progress
Create a free account to tick off lessons and pick up where you left off on any device.
of Machine Design lessons completed