


















Lesson 38 of 46 · Design Studio Projects
Reading a site
Learn to analyze a building site in layers: sun and shadow, wind, noise, views, slope, access and rules, with calculations for gradients and shadow length.
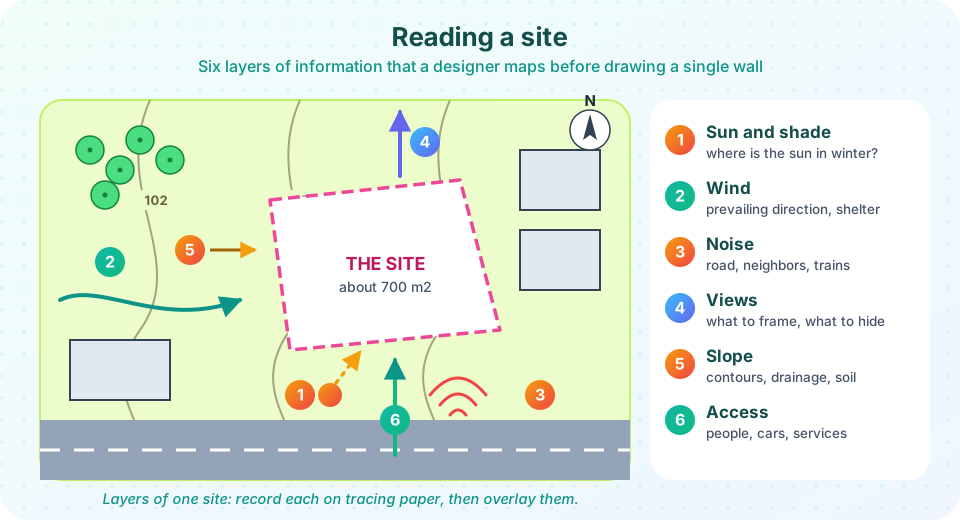
Every site has opinions. A south-facing slope wants to be a garden. A noisy road wants a buffer of storage rooms or trees between it and the bedrooms. A fine view wants a big window, and an ugly one wants a wall. A good architect listens to these opinions before drawing anything, and the listening has a name: site analysis.
Site analysis is not a ritual. Its purpose is to find the constraints that cannot be changed (the position of the sun, the slope of the ground, the legal boundary) and the opportunities that can be exploited (a view, a mature tree, a pleasant corner). A project that ignores them tends to fight its site forever. A project that respects them often finds its main idea there.
What you will learn
- The six main layers of site analysis and what to record in each
- How to calculate slope and the length of a neighbor's shadow
- How to read contour lines and a sun-path diagram
- How legal and planning rules limit what can be built
- How to turn observations into design decisions
Key terms
Contour line: a line on a map joining points of equal height; closely spaced lines mean a steep slope.
Setback: the minimum distance a building must keep from a boundary.
Orientation: the direction a building or facade faces.
Prevailing wind: the wind direction that blows most often at a place.
Context: the surrounding buildings, streets, landscape and history.
Visit, measure, record
You cannot analyze a site from a screen alone. The first step is always a site visit, preferably at different times of day. Bring a camera, a tape measure, a compass (or a phone compass), a notebook, and tracing paper to overlay on a printed map. Photograph in all directions, including the neighbors, the street and the horizon. Note things that maps cannot show: smells, sounds, the feel of the ground, where people walk, where the water pools after rain.
Then you build a base map at a convenient scale (1:500 is common for a house plot, 1:1000 for larger sites) showing the boundary, contours, buildings, trees, roads and services. Each layer of analysis is drawn on its own sheet of tracing paper over this base, so you can combine them later.
Layer 1: sun and shadow
The sun layer tells you where winter sun comes from, which parts of the site will be in shade and which neighbors will cast shadows on your building. Use the sun-angle method from Sun, wind and passive design: at solar noon, altitude = 90 - latitude + declination.
A neighbor's shadow can be calculated directly: shadow length = height / tan(altitude). At latitude 40 degrees north in midwinter, the noon altitude is 26.6 degrees. A 9 m high building then casts a shadow 9 / tan 26.6° = 18 m long, pointing north. A south-facing window 15 m north of such a building would be shaded at noon in December. That could decide the position of the whole house.
Layer 2: wind and climate
Record the direction of the prevailing wind (from local weather data, shown on a wind rose diagram) and the direction of cold or storm winds. Use this to decide where to put entrances (sheltered from cold wind), outdoor spaces (sheltered or breezy depending on climate), and openings for natural ventilation. Trees and walls on the windward side act as windbreaks, and a building itself creates wind shadows and corner turbulence that can make the pavement at a tall building's corner unpleasant.
Also note rainfall, temperature extremes, flood history and the likelihood of fire or earthquakes, which can govern the type of construction.
Layer 3: noise and air
Noise is measured in decibels (dB). A quiet bedroom at night is around 30 dB, a normal conversation about 60 dB, and a busy road can exceed 70 dB at the pavement. As a rule of thumb, an increase of 10 dB is perceived as roughly twice as loud. Mapping the noise sources (roads, railways, industry, schools, bars) helps you decide where to put buffer spaces (garages, stairs, bathrooms, storage), where to put bedrooms and where to put the quiet garden. Also note air quality and smells, such as traffic fumes or a nearby kitchen extract.
Layer 4: views and visual context
Which views should be framed, and which should be hidden? Stand where the future windows will be and look. A view of a distant hill, a courtyard tree or the sea can define the building. A view of a blank wall or a car park should be screened. Also consider views toward the site from the street and from neighbors: the building will become part of the scene, and it should add to it.
Context includes scale (heights, rhythms of windows, roof shapes), materials and character of the neighborhood. A design need not copy its neighbors, but it should show that it has noticed them.
Layer 5: topography and ground
Contour lines show how the land rises and falls. The slope is rise / run, usually expressed as a ratio or percentage. If two contours with a 1 m interval are 10 m apart on the map, the slope is 1 / 10 = 10 percent (a gradient of 1 in 10). Steep slopes affect cost (retaining walls, deep foundations), drainage (where water flows and collects), access (ramps are normally limited to about 1 in 12 at most, and gentler for comfort) and opportunities (split-level houses, terraces, views).
Record the soil if you can (clay, sand, rock), the water table, existing trees (which are often protected and have roots extending beyond their canopy), and any ruins, services or pipes under the ground.
Layer 6: access, services and rules
Where will people arrive on foot, by bicycle, by car? Where will delivery vehicles and fire engines reach? Where are the water, sewer, electricity and data connections? These determine the location of entrances, parking and service rooms.
Finally, record the legal framework. Zoning or planning rules may specify permitted uses, maximum height, setbacks from boundaries, plot coverage, floor area ratio (see City form: streets, blocks and density), required parking and protected trees or views. The buildable envelope, the three-dimensional volume where building is allowed, is the result of the physical and legal constraints together.
From analysis to decisions
Analysis only matters if it leads somewhere. After overlaying the layers, write a short list in three columns: Constraints (things you cannot change, such as the boundary, setbacks and the shade of a neighbor's building), Opportunities (things to exploit, such as the view and a south slope), and Questions (things to find out). Then write one sentence for each major finding that begins with "Therefore...". For example: The road is on the south side and noisy, but the sun comes from the south; therefore the building will turn its back to the road with a high, solid wall and open to the sun through a courtyard. That sentence is half a concept.
Common misconceptions
"Site analysis is a list of facts." Facts are only useful if they lead to decisions; every layer should end in "therefore".
"The best view always takes priority." A view toward the north in a cold climate can conflict with winter sun; designers often balance both with different windows.
"The map shows the site." Maps are out of date. Visit the site; trees grow, buildings change and drainage surprises.
"Neighbors are constraints only." A neighbor can be an opportunity too (a shared wall, a courtyard, a party).
Try it
First, two calculations from this lesson: slope from contour lines, and the shadow of a neighboring building through the seasons.
Press Run (or Ctrl + Enter) to see the result here.
Program input · what you'd type while the program runs
Type the answers before you press Run, one per line. Each time the program reads a line (with input()), it gets the next line from this box.
Second, an interactive site layer viewer. Switch layers on and off, and read what each one suggests. Notice that the best position for the building changes as layers are added.
Check your understanding
Quick check · 5 questions
of 5 answered You scored / 5 · perfect!
-
1. Contours at 1 m intervals are 8 m apart on the map. What is the slope?
Slope = rise / run = 1 / 8 = 12.5 percent (a gradient of 1 in 8). -
2. A neighboring building is 12 m tall. At solar noon the sun's altitude is 30 degrees. How long is its shadow?
Shadow = height / tan(altitude) = 12 / 0.577 = 20.8 m. -
3. What is a setback?
Setbacks are part of the zoning rules that define the buildable envelope. -
4. What should every site layer end with?
Analysis is useful only when it leads to design decisions. -
5. Which is the best use of a noisy road on the south side with the winter sun also in the south?
Balance the conflict: buffer from noise but still capture sun.
Summary
- Site analysis records six layers: sun, wind, noise, views, ground and access, plus legal rules.
- Visit the site, make a base map and draw each layer on tracing paper.
- Slope = rise / run; shadow length = height / tan(sun altitude).
- Overlay layers to find the buildable envelope and the best spots for each use.
- End every layer with "therefore": analysis must lead to design decisions.
Next: From concept to plan
Track your progress
Create a free account to tick off lessons and pick up where you left off on any device.
of Introduction to Architecture lessons completed