


















Lesson 42 of 46 · Projects and Practice
Project: design a small pavilion
A guided mini-project: design a 6 m timber pavilion from brief to board, with sun, structure, carbon, access and drawing checks and a self-assessment rubric.
The best way to find out whether you have understood a subject is to use it. This lesson gives you a small design project that touches almost everything in the course: reading a site, making a concept, drawing a plan, section and elevation, checking the sun, thinking about materials and carbon, making the building accessible, and presenting the result.
The project is deliberately modest: a pavilion in a public park, a roofed deck where people can sit, read and shelter from sun and light rain. Small buildings are the right size for learning, because you can hold the whole design in your head, and every decision shows.
What you will learn
- How to turn a written brief into a checklist of requirements
- How to apply orientation, shading, structure and access checks to a small building
- How to estimate timber volume and carbon storage at the sketch stage
- How to assess your own work with a rubric
Key terms
Pavilion: a light, usually open structure used for shelter, display or relaxation.
Post-and-beam: a structural system of vertical posts carrying horizontal beams.
Deck: a raised floor, often of timber boards on joists.
Ramp gradient: the slope of a ramp, written as 1:12 (one unit up for 12 along).
Self-assessment: judging your own work against clear criteria before others do.
The brief
Client: a city parks department. Site: a flat, open lawn at the edge of a park, about 20 m x 20 m, with a path along the south side and a row of trees along the north side. The latitude is 40 degrees north. Brief: a roofed pavilion for 8 to 12 people to sit and read, with at least one bench, protection from the summer sun, protection from light rain, and step-free access from the path. Budget for materials: modest. Preference for timber and for a design that can be taken apart.
Write the brief out in your own words and list every requirement as a short checklist item. That checklist becomes your test later.
Step 1: Orientation and site
Sketch the site in plan with north up. The path is south and the trees are north. Use the climate lessons to decide where the pavilion should open. In the northern hemisphere, a pavilion that opens to the south catches winter sun and views of the path; but the roof must shade the deck in summer. The trees to the north offer a backdrop and some wind shelter.
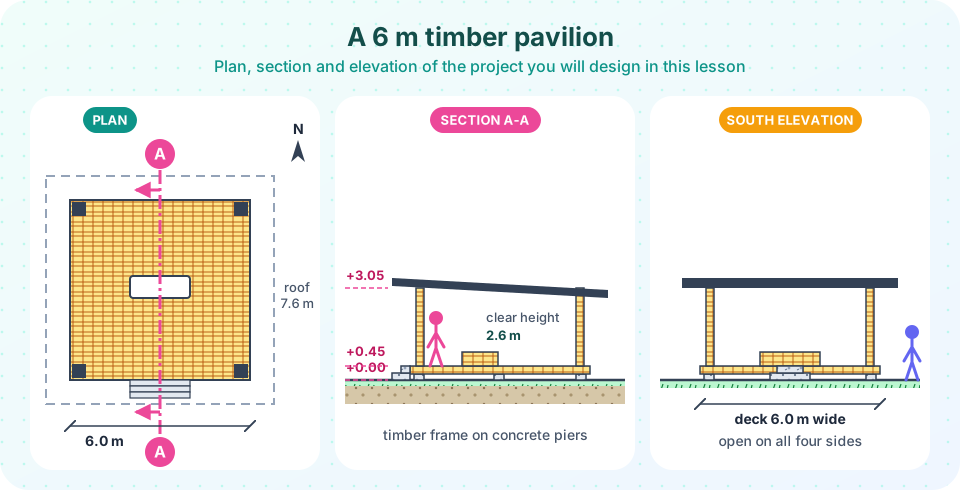
Decide the size. For 8 to 12 seated people, about 2.5 to 3 m² each, 36 m² is generous, so a 6 m x 6 m square deck is a good starting point. The reference drawing uses it, but you may choose a rectangle if your concept calls for it.
Step 2: Concept
Write one sentence, then draw three sketches that explore it. For example:
- "A floating roof held by four slender posts, so the pavilion feels like shade rather than a room."
- "A deep bench along the north edge that faces the view and the path."
- "A deck that steps down to the lawn on all sides so that people can sit anywhere."
Choose one by comparing against your checklist, not by taste alone.
Step 3: Plan, section and elevation
Draw at 1:50 on A3 paper or digitally. Include:
- Plan: deck, posts, bench, steps or ramp, a dashed outline of the roof, a north arrow, a scale bar, and the section line.
- Section A-A: deck on piers, posts, roof with its slope, bench, a standing figure (1.7 m) for scale, level marks (+0.00 ground, deck and roof levels).
- South elevation: the face people see from the path.
The reference design has a deck 0.45 m above ground, posts 2.6 m high and a roof 3.05 m above ground, which slopes gently for rain to run off. Compare with yours and ask whether the proportions feel comfortable: a clear height of 2.6 m is generous for a pavilion that is 6 m wide.
Step 4: Structure and materials
A simple post-and-beam frame works: four posts support four beams around the perimeter, and joists span between beams to carry the roof. For a first sketch, engineers often take the depth of a roof beam as roughly one fifteenth to one twentieth of its span for glued laminated timber, so a 6 m span suggests about 300 to 400 mm, but only an engineer can size it for the loads in your region (snow, wind, earthquakes). Posts of 200 mm x 200 mm are typical in drawings of this scale.
To reduce embodied carbon, design for fewer, simpler elements, use timber from managed sources (see Sustainable buildings), put the posts on piers so the timber stays off the wet ground, and use screws and bolts instead of glue so that the pavilion can be taken apart and reused.
A quick estimate of timber volume helps you see the scale of the material. Four posts of 0.2 m x 0.2 m x 2.6 m make 0.42 m³. Four perimeter beams of 6 m x 0.12 m x 0.3 m make 0.86 m³. A deck of 36 m² of 28 mm boards is 1.0 m³. Together that is already about 2.3 m³, before joists and roof, and every cubic meter of dry timber stores roughly 0.9 tonnes of carbon dioxide while it is in use.
Step 5: The sun check
Check that the roof does the job it was drawn for. Take latitude 40 degrees north, the roof edge 2.6 m above the deck and a roof that overhangs the deck by 0.8 m. The shadow of the roof's south edge moves north by 2.6 / tan(altitude) as the sun's noon altitude changes (see Sun, wind and passive design).
- Summer solstice noon, altitude 73.4 degrees: shift
2.6 / 3.37 = 0.77 m. The shadow edge lands almost exactly at the deck's edge, so the whole deck is in shade. - Equinox noon, altitude 50 degrees: shift 2.18 m. Sun reaches about 1.4 m into the deck from the south.
- Winter solstice noon, altitude 26.6 degrees: shift 5.2 m. Sun reaches about 4.4 m across the deck. A welcome warmth in winter.
An overhang of 0.8 m is therefore a good choice here. If you chose a different roof height or latitude, recompute it.
Step 6: Access
The deck is 0.45 m above the ground, so people in wheelchairs, with pushchairs or with walkers need a ramp or a lower deck. A ramp at 1:12 needs 0.45 x 12 = 5.4 m of length, and many codes also require landings, handrails and a gentler gradient where possible (1:20 would need 9 m). Alternatives: lower the deck to 0.15 m (a ramp of 1.8 m at 1:12) or shape the ground to meet the deck. This is a good example of a detail that can change the concept: the "floating" idea might give way to a deck at ground level.
Step 7: Present
Compose an A1 landscape board (see Presentation and critique) with a hero image or model photo, the site plan, plan, section, elevation and concept diagram. Prepare a five-minute talk with the five beats: context, idea, design, experience, questions. Ask a friend to give you a critique with the four steps: describe, interpret, evaluate, suggest.
Common misconceptions
"A small project needs no analysis." Small buildings fail for the same reasons as large ones: wrong orientation, bad drainage, no access.
"Open means no structure." A pavilion's thin posts and roof carry real loads; the structure must be designed even if it is slender.
"Steps are fine because the deck is low." Even 0.45 m is a barrier to many users; access is a design requirement, not an afterthought.
Try it
First, a calculator for the checks in Steps 4 to 6. Change the latitude, the roof height, the overhang or the deck height and see what happens.
Press Run (or Ctrl + Enter) to see the result here.
Program input · what you'd type while the program runs
Type the answers before you press Run, one per line. Each time the program reads a line (with input()), it gets the next line from this box.
Second, a rubric. Tick the criteria that your design meets. The score is only a conversation starter; the real value is seeing the gaps.
Check your understanding
Quick check · 4 questions
of 4 answered You scored / 4 · perfect!
-
1. A deck is 0.30 m above the ground. How long is a ramp at 1:12?
0.30 x 12 = 3.6 m. -
2. Why does a 0.8 m overhang shade the whole deck at summer noon in the example?
At 73.4 degrees, 2.6 / tan 73.4 is about 0.77 m, about equal to the overhang. -
3. What does 'post-and-beam' describe?
Post-and-beam is a frame structure. -
4. How can a timber pavilion be designed for reuse?
Mechanical fixings can be undone, so components can be reused.
Summary
- A small project can use the whole course: site, concept, drawings, structure, sun, carbon, access, presentation.
- Check the sun with shadow-shift geometry; check access with ramp gradients.
- Estimate timber volume early to see the material scale and carbon storage.
- Self-assess against a rubric and ask for a critique.
Track your progress
Create a free account to tick off lessons and pick up where you left off on any device.
of Introduction to Architecture lessons completed