


















Lesson 37 of 46 · Design Studio Projects
Chapter 8 overview: design studio projects
Learn how an architecture studio project works: the loop of brief, site, concept, development, testing and presentation, plus how stages map to professional practice.
In an architecture school, the design studio is the center of everything. It is a room with long tables, pinned-up drawings, glue guns, laptops and models in every stage of completion. Students are given a brief (a short description of a building to design), a site, and a few weeks. They are not given a method. Over the course of the project, they learn to invent one.
The studio can seem mysterious from outside. Where do designs come from? How do experienced designers know when an idea is good enough? This chapter demystifies the process. It will not tell you what to design, but it will give you a reliable way of working, a vocabulary for talking about designs, and three practical skills: reading a site, turning an idea into a plan and presenting a project to critics.
What you will learn
- The six working steps of a studio project and why they form a loop
- How a studio project mirrors the professional stages of design
- The habits of good studio work: sketching, modeling, comparing options, asking for feedback
- What the lessons in this chapter cover and what to bring to each
Key terms
Brief: the written description of what is to be designed: users, spaces, areas, budget and constraints.
Concept: the central idea of a design, which explains many of its decisions at once.
Iteration: repeating a cycle of design and testing, with each pass improving the result.
Desk crit: a one-to-one conversation between student and tutor at the student's desk.
Review (crit, jury): a formal presentation of a design to a panel of critics.
The loop
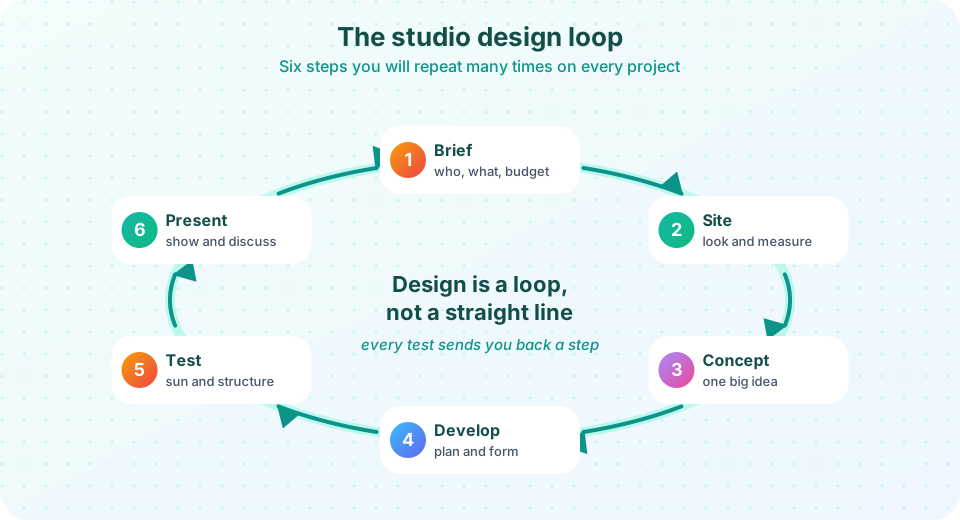
Read the picture above clockwise. A project begins with a brief that says who the building is for, what it must contain, how much money and area is available, and what rules apply. Then the designer studies the site (see Reading a site). Out of the brief and the site comes a concept, an organizing idea (see From concept to plan). The idea is developed into plans, sections and models, tested against the brief, the sun, scale and structure, and finally presented for discussion (see Presentation and critique).
The arrow from Present back to Brief is the important one. Feedback leads to a better understanding of the brief, which leads to a better design. Beginners often treat the steps as a one-way street and become attached to the first idea. Experienced designers go round the loop quickly, many times, with simple sketches and models, because a bad idea is cheap to discard on paper and expensive to discard on site.
1 Brief
2 Site
3 Concept
4 Develop and test
5 Present
How studio relates to practice
A professional project follows named stages. In the United Kingdom the RIBA Plan of Work (2020 version) numbers them 0 to 7: Strategic Definition, Preparation and Briefing, Concept Design, Spatial Coordination, Technical Design, Manufacturing and Construction, Handover, and Use. In the United States, the American Institute of Architects uses phases called schematic design, design development, construction documents, bidding and construction administration. The names differ, but the logic is the same: from vague to precise, from "what" to "how". Most studio projects stop at the equivalent of the early stages, concept and spatial design, because their aim is to learn to think, not to produce a complete set of construction drawings.
Habits of strong studio work
- Draw every day. Sketching is thinking. A page of quick diagrams teaches more than an hour of staring.
- Make many options. Three different concepts, tried quickly, beat one idea polished for a week. Compare them honestly.
- Work in section and model as well as plan. A plan can look good and give a bad space. Cutting a section through your design tests height, light and structure.
- Use precedents. A precedent is an existing building that solves a similar problem. Study how it works, but do not copy it.
- Keep a design diary. Record decisions and reasons. When you present, you will need the "why".
- Seek feedback early. Show half-finished work. It is much easier to improve a design that is still soft.
- Manage time. Roughly a third of the time should go to understanding and concept, a third to development and testing, and a third to production and presentation; the last tends to take longer than expected.
What each lesson covers
- Reading a site shows how to record sun, wind, noise, views, slope and access in layers, and what each layer suggests.
- From concept to plan walks from a bubble diagram to a block plan to a drawn plan, with area budgets.
- Presentation and critique covers board layout, the five-minute talk and the art of giving and receiving criticism.
- Chapter review pulls the process together with the stage timeline and a quiz.
Try it
Click through the stages of the loop and see the questions and outputs for each. Then use the time planner to split a six-week project.
Press Run (or Ctrl + Enter) to see the result here.
Program input · what you'd type while the program runs
Type the answers before you press Run, one per line. Each time the program reads a line (with input()), it gets the next line from this box.
Check your understanding
Quick check · 4 questions
of 4 answered You scored / 4 · perfect!
-
1. What is a design brief?
The brief defines what is to be designed, before any design begins. -
2. Why does the design loop have an arrow back from Present to Brief?
Each lap through the loop clarifies the problem and the solution. -
3. What is a precedent?
Studying precedents teaches how others solved similar problems. -
4. Which stage of the RIBA Plan of Work is 'Concept Design'?
Stage 2 is Concept Design; stage 3 is Spatial Coordination.
Summary
- Studio work runs in a loop: brief, site, concept, develop, test, present, then back round.
- Make many quick options and test them with sections and models.
- Studio projects mirror early professional stages (RIBA stages 0 to 3 or AIA schematic design).
- Draw daily, use precedents, keep a design diary and ask for feedback early.
Next: Reading a site
Track your progress
Create a free account to tick off lessons and pick up where you left off on any device.
of Introduction to Architecture lessons completed