


















Lesson 28 of 45 · Manufacturing and Assembly
Chapter 6 overview: manufacturing and assembly
Follow a board from CAD files through fabrication, stencil printing, pick and place, reflow and inspection, and learn what each step demands from your design.
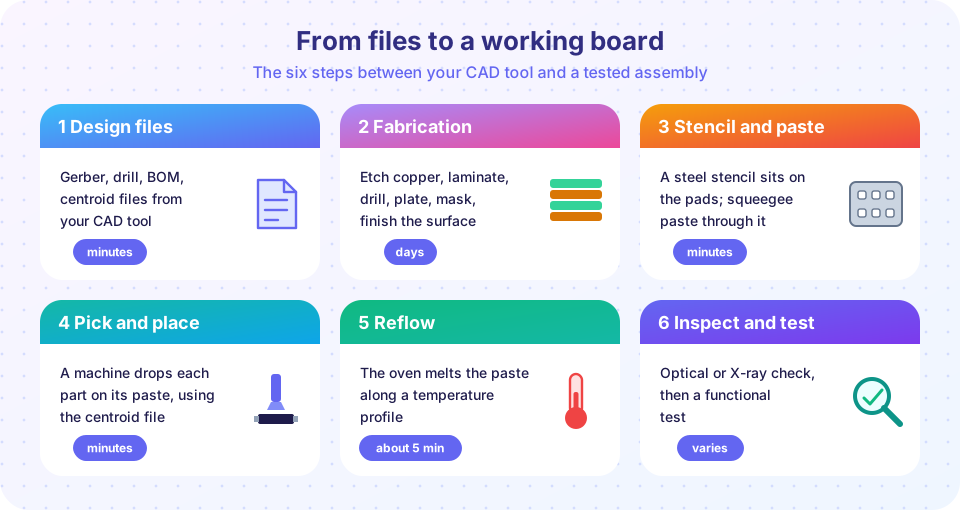
Until now your board has existed only on a screen. This chapter follows it onto a factory floor. The journey has two halves: fabrication, where a stack of copper and glass-epoxy becomes a bare board, and assembly, where parts are soldered onto it. Both halves are automated, both are governed by physical limits, and both reward a designer who understands them.
Why does a designer need to know this? Because nearly every manufacturing problem is decided at the design stage. A pad that is slightly too small tombstones a resistor in the oven. A drill that is too fine for the board thickness cannot be plated. A missing file means the factory guesses. The cheapest time to fix any of it is before you press "order".
What you will learn
- Describe the steps that turn a stack of laminate into a bare PCB.
- Name the files a fab and an assembly house need, and what each contains.
- Explain how solder paste, placement and reflow produce a joint.
- Know the typical design-rule limits that decide cost and yield.
Key terms
Fabrication (fab): making the bare board from the copper-clad laminate.
Assembly: soldering components onto the board.
Panel: a larger sheet of several boards manufactured together.
Solder paste: a mixture of tiny solder spheres and flux, printed onto pads.
Reflow: heating the board so that the paste melts and forms joints.
The big picture
Step 1 and 2: files and fabrication
Step 3 and 4: paste and placement
Step 5 and 6: reflow and test
Each step drives a design rule
What each lesson covers
| Lesson | You will learn |
|---|---|
| How a board is made | Stackup, lamination, drilling, plating, etching, finishes, and the design rules that follow. |
| Gerbers and fabrication files | What goes into the package and how to check it before you order. |
| Assembly, soldering and reflow | Paste, stencils, placement, the reflow profile, defects and hand soldering. |
| Chapter review | A poster and ten questions. |
Common misconceptions
"The factory will fix my design." Fabs run automated checks and may query obvious problems, but they build what the files say. If the files are wrong, you receive wrong boards.
"Cheaper boards are lower quality." Low-cost fabs build good boards when you stay inside their standard rules. Cost rises when you ask for tight tolerances, extra layers, or unusual finishes.
"Assembly is just soldering." Production assembly is a statistical process: paste volume, placement accuracy and oven profile all have to stay inside windows.
Try it
Press Run (or Ctrl + Enter) to see the console output here.
No output.
Check your understanding
Quick check · 3 questions
of 3 answered You scored / 3 · perfect!
-
1. Which is the correct order of the main production steps?
The bare board is fabricated first. Then paste is printed, parts are placed, and the board goes through reflow. -
2. What is solder paste?
Paste is a mix of solder powder and flux that is printed on pads and melted in the oven. -
3. Who decides how pads and drills end up on the board?
Fabrication and assembly are driven by your files.
Summary
- Fabrication makes the bare board; assembly soldered parts to it.
- Both are automated and bound by physical limits that become your design rules.
- Good files and sensible rules are the cheapest quality investment.
Next: How a board is made
Track your progress
Create a free account to tick off lessons and pick up where you left off on any device.
of PCB Design and Prototyping lessons completed